Node.js 无标题混合片段
Node.js 是一个开源、跨平台的JavaScript运行时环境,它允许开发者在服务器端运行JavaScript代码。由Ryan Dahl在2009年创建,Node.js 的设计目标是提供一种高效、轻量级的方式来构建可扩展的网络应用程序。
| 序号 | 特点 | 说明 |
|---|---|---|
| 1 | 开源 | Node.js 是一个开源项目,任何人都可以自由使用和修改。 |
| 2 | 跨平台 | 支持在 Windows、Linux 和 macOS 等多个平台上运行。 |
| 3 | 事件驱动 | 采用事件驱动模型,适合处理大量并发连接。 |
| 4 | 非阻塞I/O | 非阻塞I/O模型使得 Node.js 能够高效地处理 I/O 密集型任务。 |
| 5 | 单线程 | JavaScript 代码在单个线程上运行,通过事件循环处理并发。 |
| 6 | V8引擎 | 使用 Google 的 V8 引擎执行 JavaScript 代码,提供高性能。 |
| 7 | NPM | 拥有强大的包管理器 npm,方便安装和管理第三方库。 |
| 8 | 适用于多种应用 | 可用于构建 Web 服务器、命令行工具、桌面应用等。 |
| 9 | JavaScript Everywhere | 允许使用 JavaScript 编写前端和后端代码,简化开发流程。 |
| 10 | 模块化 | 鼓励使用模块化设计,提高代码的可重用性和可维护性。 |
| 11 | ES6及更新特性支持 | 支持最新的 JavaScript 语言特性,包括 ES6 和更新的 ECMAScript 标准。 |
于是一个集中管理的工具应运而生:大家都把自己开发的模块打包后放到npm官网上,如果要使用,直接通过npm安装就可以直接用,不用管代码存在哪,应该从哪下载。
(1)使用模块
'use strict';
// 引入hello模块:const greet = require('./hello');  // 要写相对目录!如果只写模块名,则Node会依次在内置模块、全局模块和当前模块下查找hello.js,很可能会得到一个错误let s = 'Michael';greet(s); // Hello, Michael!
// module.exports = variable;module.exports = variable;// 要引入其他模块输出的对象,用:const foo = require('other_module');
// Node.js加载了hello.js后,它可以把代码包装一下。原来的全局变量s现在变成了匿名函数内部的局部变量。不影响同名其他模块变量(function () {    // 读取的hello.js代码:    let s = 'Hello';    let name = 'world';
    console.log(s + ' ' + name + '!');    // hello.js代码结束})();
// 模块的输出module.exports实现// 准备module对象:let module = {    id: 'hello',    exports: {}};let load = function (module) {    // 读取的hello.js代码:    function greet(name) {        console.log('Hello, ' + name + '!');    }
    module.exports = greet;    // hello.js代码结束    return module.exports;};let exported = load(module);// 保存module:save(module, exported);
// 可见,变量module是Node在加载js文件前准备的一个变量,并将其传入加载函数,我们在hello.js中可以直接使用变量module原因就在于它实际上是函数的一个参数:module.exports = greet;// 通过把参数module传递给load()函数,hello.js就顺利地把一个变量传递给了Node执行环境,Node会把module变量保存到某个地方。// 由于Node保存了所有导入的module,当我们用require()获取module时,Node找到对应的module,把这个module的exports变量返回,这样,另一个模块就顺利拿到了模块的输出:const greet = require('./hello');

// 在Node环境中,有两种方法可以在一个模块中输出变量:// 对module.exports赋值// hello.jsfunction hello() {    console.log('Hello, world!');}function greet(name) {    console.log('Hello, ' + name + '!');}module.exports = {    hello: hello,    greet: greet};
// 直接使用exports// hello.jsfunction hello() {    console.log('Hello, world!');}function greet(name) {    console.log('Hello, ' + name + '!');}function hello() {    console.log('Hello, world!');}exports.hello = hello;exports.greet = greet;
// 分析Node的加载机制// 首先,Node会把整个待加载的hello.js文件放入一个包装函数load中执行。在执行这个load()函数前,Node准备好了module变量:let module = {    id: 'hello',    exports: {}};// load()函数最终返回module.exports:let load = function (exports, module) {    // hello.js的文件内容    ...    // load函数返回:    return module.exports;};let exported = load(module.exports, module);// 也就是说,默认情况下,Node准备的exports变量和module.exports变量实际上是同一个变量,并且初始化为空对象{},于是,我们可以写:exports.foo = function () { return 'foo'; };exports.bar = function () { return 'bar'; };// huomodule.exports.foo = function () { return 'foo'; };module.exports.bar = function () { return 'bar'; };// 如果我们要输出的是一个函数或数组,那么,只能给module.exports赋值:module.exports = function () { return 'foo'; };

// 可以得出结论:直接对module.exports赋值,可以应对任何情况:module.exports = {    foo: function () { return 'foo'; }};// huomodule.exports = function () { return 'foo'; };
(2)ESM
随着ES 6标准的推出,JavaScript语言本身终于也迎来了原生内置的模块支持,称为ECMAScript Modules(简称ESM),不仅可以直接在浏览器中使用模块,也可以在Node.js中使用ESM模块。
// 不使用ESM模块时,我们用module.exports导出可供外部使用的JS对象,例如,以下模块导出了两个函数'use strict';let s = 'Hello';
function out(prompt, name) {    console.log(`${prompt}, ${name}!`);}
function greet(name) {    out(s, name);}
function hi(name) {    out('Hi', name);}
module.exports = {    greet: greet,    hi: hi};
// 要把上述代码改为ESM模块,我们用export标识需要导出的函数:// 并将其保存为hello.mjs文件,注意扩展名不是.js,而是.mjs。let s = 'Hello';// out是模块内部函数,模块外部不可见:function out(prompt, name) {    console.log(`${prompt}, ${name}!`);}// greet是导出函数,可被外部调用:export function greet(name) {    out(s, name);}// hi是导出函数,可被外部调用:export function hi(name) {    out('Hi', name);}
// 可以再编写一个main.mjs文件来调用hello模块:// 可见,ESM模块用export关键字导出一个JS对象,用import关键字导入一个模块的导出对象。import { greet, hi } from './hello.mjs';let name = 'Bob';greet(name);hi(name);
// 单个函数导出,ESM模块默认启用严格模式module.exports = greet;export default function greet(name) {    ...}// 相应的,导入代码修改为:import greet from './hello.mjs';
// 浏览器来说,也可以直接使用ESM模块<html><head>    <script type="module" src="./example.js"></script>    <script type="module">        greet('Bob');    </script></head>...</html>
// 或者<html><head>    <script type="module">        import { greet } from './example.js';        greet('Bob');    </script></head>...</html>
(3)基本模块
// 导入模块有两种方法const { randomInt } = require('node:crypto');const n = randomInt(0, 100); // 0~100之间的随机数console.log(n);
// 使用import关键字导入ESM模块import { randomInt } from 'node:crypto';const n = randomInt(0, 100); // 0~100之间的随机数console.log(n);| 模块名称 | 功能描述 | 使用场景 | 代码示例 |
|---|---|---|---|
| global | Node.js中的全局对象,不同于浏览器中的window对象 | 访问全局变量和功能,如global.process | console.log(global.process); |
| process | 表示当前Node.js进程的对象,包含进程信息和控制 | 控制进程行为,如退出代码、工作目录等 | console.log(process.cwd()); |
| fs | 文件系统模块,用于读写文件 | 文件操作,包括异步和同步方法 | fs.readFile('file.txt', 'utf-8', (err, data) => { console.log(data); }); |
| stream | 支持“流”的数据结构,用于处理连续的数据 | 数据流的读取和写入,如文件流、网络流等 | let rs = fs.createReadStream('file.txt'); rs.on('data', (chunk) => { console.log(chunk); }); |
| http | 提供HTTP服务器和客户端功能的模块 | 创建Web服务器,处理HTTP请求和响应 | const server = http.createServer((req, res) => { res.end('Hello World'); }); server.listen(8080); |
| crypto | 提供加密和哈希算法的模块 | 数据加密、哈希计算等安全功能 | const hash = crypto.createHash('md5'); hash.update('some data'); console.log(hash.digest('hex')); |
在前面的JavaScript课程中,我们已经知道,JavaScript有且仅有一个全局对象,在浏览器中,叫window对象。而在Node.js环境中,也有唯一的全局对象,但不叫window,而叫global,这个对象的属性和方法也和浏览器环境的window不同。进入Node.js交互环境,可以直接输入:
> global.consoleObject [console] { log: [Function: log], warn: [Function: warn], dir: [Function: dir], time: [Function: time], ...}process也是Node.js提供的一个对象,它代表当前Node.js进程。通过process对象可以拿到许多有用信息:
> process === global.process;true> process.version;'v22.3.0'> process.platform;'darwin'> process.arch;'x64'> process.cwd(); //返回当前工作目录'/Users/michael'> process.chdir('/private/tmp'); // 切换当前工作目录undefined> process.cwd();'/private/tmp'1)fs
因为JavaScript的单线程模型,执行IO操作时,JavaScript代码无需等待,而是传入回调函数后,继续执行后续JavaScript代码。比如jQuery提供的getJSON()操作:
$.getJSON('http://example.com/ajax', function (data) {    console.log('IO结果返回后执行...');});console.log('不等待IO结果直接执行后续代码...');
// 同步的IO操作则需要等待函数返回// 根据网络耗时,函数将执行几十毫秒~几秒不等:let data = getJSONSync('http://example.com/ajax');

// 异步读文件// read-text-file-async.mjsimport { readFile } from 'node:fs';
console.log('BEGIN');
readFile('sample.txt', 'utf-8', function (err, data) {    if (err) {        console.log(err);    } else {        console.log(data);    }});
console.log('END');
// 当读取二进制文件时,不传入文件编码时,回调函数的data参数将返回一个Buffer对象。在Node.js中,Buffer对象就是一个包含零个或任意个字节的数组(注意和Array不同)。// Buffer -> Stringlet text = data.toString('utf-8');console.log(text);// 或者把一个String转换成Buffer:// String -> Bufferlet buf = Buffer.from(text, 'utf-8');console.log(buf);

// 同步读文件// read-text-file-sync.mjsimport { readFileSync } from 'node:fs';console.log('BEGIN');try {    let s = readFileSync('sample.txt', 'utf-8');    console.log(s);} catch (err) {    console.log(err);}console.log('END');
// 写文件// write-file-async.mjsimport { writeFile } from 'node:fs';let data = 'Hello, Node.js';writeFile('output.txt', data, function (err) {    if (err) {        console.log(err);    }});
// 如果我们要获取文件大小,创建时间等信息,可以使用fs.stat(),它返回一个Stat对象,能告诉我们文件或目录的详细信息:// read-stat-async.mjsimport { stat } from 'node:fs';stat('sample.png', function (err, st) {    if (err) {        console.log(err);    } else {        // 是否是文件:        console.log('isFile: ' + st.isFile());        // 是否是目录:        console.log('isDirectory: ' + st.isDirectory());        if (st.isFile()) {            // 文件大小:            console.log('size: ' + st.size);            // 创建时间, Date对象:            console.log('birth time: ' + st.birthtime);            // 修改时间, Date对象:            console.log('modified time: ' + st.mtime);        }    }});
// Node还提供Promise版本的fs,可以用如下代码在async函数中读取文件:// async-read.mjsimport { readFile } from 'node:fs/promises';async function readTextFile(path) {    return await readFile(path, 'utf-8');}readTextFile('sample.txt').then(s => console.log(s));
2)stream
stream是Node.js提供的又一个仅在服务区端可用的模块,目的是支持“流”这种数据结构。
什么是流?流是一种抽象的数据结构。想象水流,当在水管中流动时,就可以从某个地方(例如自来水厂)源源不断地到达另一个地方(比如你家的洗手池)。我们也可以把数据看成是数据流,比如你敲键盘的时候,就可以把每个字符依次连起来,看成字符流。这个流是从键盘输入到应用程序,实际上它还对应着一个名字:标准输入流(stdin)。流的特点是数据是有序的,而且必须依次读取,或者依次写入,不能像Array那样随机定位。
在Node.js中,流也是一个对象,我们只需要响应流的事件就可以了:data事件表示流的数据已经可以读取了,end事件表示这个流已经到末尾了,没有数据可以读取了,error事件表示出错了。
import { createReadStream } from 'node:fs';
// 打开流:let rs = createReadStream('sample.txt', 'utf-8');
// 读取到数据:rs.on('data', (chunk) => {    // data事件可能会有多次,每次传递的chunk是流的一部分数据。    console.log('---- chunk ----');    console.log(chunk);});
// 结束读取:rs.on('end', () => {    console.log('---- end ----');});
// 出错:rs.on('error', err => {    console.log(err);});

// 要以流的形式写入文件,只需要不断调用write()方法,最后以end()结束:import { createWriteStream } from 'node:fs';
let ws = createWriteStream('output.txt', 'utf-8');ws.write('使用Stream写入文本数据...\n');ws.write('继续写入...\n');ws.write('DONE.\n');ws.end(); // 结束写入
// 写入二进制数据:let b64array = [ ... ];
let ws2 = createWriteStream('output.png');for (let b64 of b64array) { let buf = Buffer.from(b64, 'base64'); ws2.write(buf); // 写入Buffer对象}ws2.end(); // 结束写入就像可以把两个水管串成一个更长的水管一样,两个流也可以串起来。一个Readable流和一个Writable流串起来后,所有的数据自动从Readable流进入Writable流,这种操作叫pipe。在Node.js中,Readable流有一个pipe()方法,就是用来干这件事的:
rs.pipe(ws);
// Node还提供了pipeline功能,它可以将一个流输出到另一个流。以下是一个复制文件的程序:import { createReadStream, createWriteStream } from "node:fs";import { pipeline } from 'node:stream/promises';
async function copy(src, dest) {    let rs = createReadStream(src);    let ws = createWriteStream(dest);    await pipeline(rs, ws);}
copy('sample.txt', 'output.txt')    .then(() => console.log('copied.'))    .catch(err => console.log(err));
3)http
因为JavaScript实际上已经统治了浏览器端的脚本,其优势就是有世界上数量最多的前端开发人员。如果已经掌握了JavaScript前端开发,再学习一下如何将JavaScript应用在后端开发,就是名副其实的全栈了。
应用程序并不直接和HTTP协议打交道,而是操作http模块提供的request和response对象。
request对象封装了HTTP请求,我们调用request对象的属性和方法就可以拿到所有HTTP请求的信息;
response对象封装了HTTP响应,我们操作response对象的方法,就可以把HTTP响应返回给浏览器。
// 导入http模块:import http from 'node:http';
// 创建http server,并传入回调函数:const server = http.createServer((request, response) => {    // 回调函数接收request和response对象,    // 获得HTTP请求的method和url:    console.log(request.method + ': ' + request.url);    // 将HTTP响应200写入response, 同时设置Content-Type: text/html:    response.writeHead(200, {'Content-Type': 'text/html'});    // 将HTTP响应的HTML内容写入response:    response.end('<h1>Hello world!</h1>');});
// 出错时返回400:server.on('clientError', (err, socket) => {  socket.end('HTTP/1.1 400 Bad Request\r\n\r\n');});
// 让服务器监听8080端口:server.listen(8080);console.log('Server is running at http://127.0.0.1:8080/');
// cmd$ node simple-server.mjsServer is running at http://127.0.0.1:8080/
// 文件服务器,设定一个目录,然后让Web程序变成一个文件服务器let url = new URL('http://localost' + '/index.html?v=1');let pathname = url.pathname;console.log(pathname); // index.html
import path from 'node:path';// 解析当前目录:let workDir = path.resolve('.'); // '/Users/michael'// 组合完整的文件路径:当前目录+'pub'+'index.html':let filePath = path.join(workDir, 'pub', 'index.html');// '/Users/michael/pub/index.html'
// 实现一个文件服务器// 导入http模块:import http from 'node:http';import path from 'node:path';import { createReadStream } from 'node:fs';import { stat } from 'node:fs/promises';
// 设定www根目录为当前目录:const wwwRoot = path.resolve('.');console.log(`set www root: ${wwwRoot}`);
// 根据扩展名确定MIME类型:function guessMime(pathname) { // FIXME: return 'text/html';}
// 创建http file server,并传入回调函数:const server = http.createServer((request, response) => { // 获得HTTP请求的method和url: console.log(request.method + ': ' + request.url); if (request.method !== 'GET') { response.writeHead(400, { 'Content-Type': 'text/html' }); response.end('<h1>400 Bad Request</h1>'); } else { // 解析path: let url = new URL(`http://localhost${request.url}`); let pathname = url.pathname; let filepath = path.join(wwwRoot, pathname); // TODO: 必要的安全检查 // 检查文件状态: stat(filepath).then(st => { if (st.isFile()) { console.log('200 OK'); // 发送200响应: response.writeHead(200, { 'Content-Type': guessMime(pathname) }); // 将文件流导向response: createReadStream(filepath).pipe(response); } else { console.log('404 Not Found'); response.writeHead(404, { 'Content-Type': 'text/html' }); response.end('<h1>404 Not Found</h1>'); } }).catch(err => { console.log('404 Not Found'); response.writeHead(404, { 'Content-Type': 'text/html' }); response.end('<h1>404 Not Found</h1>'); }); }});
// 出错时返回400:server.on('clientError', (err, socket) => { socket.end('HTTP/1.1 400 Bad Request\r\n\r\n');});
// 让服务器监听8080端口:server.listen(8080);console.log('Server is running at http://127.0.0.1:8080/');4)cryto
crypto模块的目的是为了提供通用的加密和哈希算法。用纯JavaScript代码实现这些功能不是不可能,但速度会非常慢。Nodejs用C/C++实现这些算法后,通过cypto这个模块暴露为JavaScript接口,这样用起来方便,运行速度也快。
//MD5是一种常用的哈希算法,用于给任意数据一个“签名”。这个签名通常用一个十六进制的字符串表示:import crypto from 'node:crypto';const hash = crypto.createHash('md5');// 可任意多次调用update():hash.update('Hello, world!');hash.update('Hello, nodejs!');console.log(hash.digest('hex')); // 7e1977739c748beac0c0fd14fd26a544
// 如果要计算SHA1,只需要把'md5'改成'sha1',就可以得到SHA1的结果。还可以使用更安全的sha256和sha512
// Hmac算法也是一种哈希算法,它可以利用MD5或SHA1等哈希算法。不同的是,Hmac还需要一个密钥:import crypto from 'node:crypto';const hmac = crypto.createHmac('sha256', 'secret-key');hmac.update('Hello, world!');hmac.update('Hello, nodejs!');console.log(hmac.digest('hex')); // 80f7e22570...

// AES是一种常用的对称加密算法,加解密都用同一个密钥。crypto模块提供了AES支持,但是需要自己封装好函数,便于使用:import crypto from 'node:crypto';function aes_encrypt(key, iv, msg) {    const cipher = crypto.createCipheriv('aes-256-cbc', key, iv);    // input encoding: utf8    // output encoding: hex    let encrypted = cipher.update(msg, 'utf8', 'hex');    encrypted += cipher.final('hex');    return encrypted;}
function aes_decrypt(key, iv, encrypted) {    const decipher = crypto.createDecipheriv('aes-256-cbc', key, iv);    let decrypted = decipher.update(encrypted, 'hex', 'utf8');    decrypted += decipher.final('utf8');    return decrypted;}// key的长度必须为32bytes:let key = 'Passw0rdPassw0rdPassw0rdPassw0rd';// iv的长度必须为16bytes:let iv = 'a1b2c3d4e5f6g7h8';let msg = 'Hello, world!';// 加密:let encrypted_msg = aes_encrypt(key, iv, msg);// 解密:let decrypted_msg = aes_decrypt(key, iv, encrypted_msg);
console.log(`AES encrypt: ${encrypted_msg}`);console.log(`AES decrypt: ${decrypted_msg}`);


// Diffie-Hellman,DH算法是一种密钥交换协议,它可以让双方在不泄漏密钥的情况下协商出一个密钥来。DH算法基于数学原理
// RSA算法是一种非对称加密算法,即由一个私钥和一个公钥构成的密钥对,通过私钥加密,公钥解密,或者通过公钥加密,私钥解密。其中,公钥可以公开,私钥必须保密。

// 使用crypto模块提供的方法,即可实现非对称加解密。import fs from 'node:fs';import crypto from 'node:crypto';
// 从文件加载key:function loadKey(file) {    // key实际上就是PEM编码的字符串:    return fs.readFileSync(file, 'utf8');}
let    prvKey = loadKey('./rsa-prv.pem'),    pubKey = loadKey('./rsa-pub.pem'),    message = 'Hello, world!';
// 使用私钥加密:let enc_by_prv = crypto.privateEncrypt(prvKey, Buffer.from(message, 'utf8'));console.log(enc_by_prv.toString('hex'));
let dec_by_pub = crypto.publicDecrypt(pubKey, enc_by_prv);console.log(dec_by_pub.toString('utf8'));
// 使用公钥加密:let enc_by_pub = crypto.publicEncrypt(pubKey, Buffer.from(message, 'utf8'));console.log(enc_by_pub.toString('hex'));
// 使用私钥解密:let dec_by_prv = crypto.privateDecrypt(prvKey, enc_by_pub);console.log(dec_by_prv.toString('utf8'));
**(4)Web开发 **
1)koa
koa是Express的下一代基于Node.js的web框架,目前有1.x和2.0两个版本。
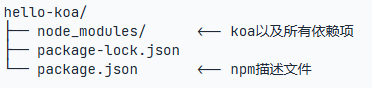
package.json包含了npm的依赖信息,以及项目描述等信息,package-lock.json是针对当前所有依赖的一个快照,目的是锁定各个依赖项的版本号。
{ "name": "hello-koa", "version": "1.0", "description": "Hello koa webapp.", "type": "module", "dependencies": { "koa": "^2.15.3" }}node_modules是所有依赖项安装的地方,可以随时删除node_modules目录,然后用npm install重新安装。
直接运行npm install则根据package.json的dependencies信息下载安装依赖项,运行npm install xyz则将xyz添加到dependencies然后再安装xyz及其依赖项。因此,熟练的开发者可以先自己编辑dependencies内容,然后删除node_modules后重新安装所有依赖项。此外,package.json和package-lock.json应当添加至版本控制系统中,而node_modules则无需添加。
// 创建app.mjs文件// 导入koa,注意导入的是大写开头的class:import Koa from 'koa';
// 创建一个koa实例表示webapp本身:const app = new Koa();
// 对于任何请求,app将调用该异步函数处理请求:app.use(async (ctx, next) => {    await next();    // 设置响应类型和文本:    ctx.response.type = 'text/html';    ctx.response.body = '<h1>Hello Koa!</h1>';});
// 在端口3000监听:app.listen(3000);console.log('app started at port 3000...');

// koa就会调用通过app.use()注册的async函数,并传入ctx和next参数。用await next()来调用下一个async函数。我们把每个async函数称为middleware,这些middleware可以组合起来,完成很多有用的功能。可以用以下3个middleware组成处理链,依次打印日志,记录处理时间,输出HTMLapp.use(async (ctx, next) => {    console.log(`${ctx.request.method} ${ctx.request.url}`); // 打印URL    await next(); // 调用下一个middleware});
app.use(async (ctx, next) => {    const start = Date.now(); // 当前时间    await next(); // 调用下一个middleware    const ms = Date.now() - start; // 耗费时间    console.log(`Time: ${ms}ms`); // 打印耗费时间});
app.use(async (ctx, next) => {    await next();    ctx.response.type = 'text/html';    ctx.response.body = '<h1>Hello Koa!</h1>';});
app.use(async (ctx, next) => {    if (await checkUserPermission(ctx)) {        await next();    } else {        ctx.response.status = 403;    }});
处理url
import Koa from 'koa';import Router from '@koa/router';
const app = new Koa();const router = new Router();
// log url:app.use(async (ctx, next) => {    console.log(`Process ${ctx.request.method} ${ctx.request.url}...`);    await next();});
// 解析request.body:app.use(bodyParser());
// 设置路由: 处理 /router.get('/', async (ctx, next) => {    ctx.response.type = 'text/html';    ctx.response.body = '<h1>Index Page</h1>';});
// 设置路由: 处理 /hello/:namerouter.get('/hello/:name', async (ctx, next) => {    // 获取:name参数:    let s = ctx.params.name;    ctx.response.type = 'text/html';    ctx.response.body = `<h1>Hello, ${s}</h1>`;});
// 使用router:app.use(router.routes());
app.listen(3000);console.log('app started at port 3000...');

// 处理post请求,写一个简单的登录表单router.get('/', async (ctx, next) => {    ctx.response.type = 'text/html';    ctx.response.body = `<h1>Index Page</h1><form action="/signin" method="post">    <p>Name: <input name="name" value="koa"></p>    <p>Password: <input name="password" type="password"></p>    <p><button type="submit">Submit</button></p></form>`;});
router.post('/signin', async (ctx, next) => {    let name = ctx.request.body.name || '';    let password = ctx.request.body.password || '';    console.log(`try signin: ${name}, password: ${password}`);    if (name === 'koa' && password === '12345') {        ctx.response.type = 'text/html';        ctx.response.body = `<h1>Welcome, ${name}!</h1>`;    } else {        ctx.response.type = 'text/html';        ctx.response.body = '<h1>Signin failed!</h1><p><a href="/">Retry</a></p>';    }});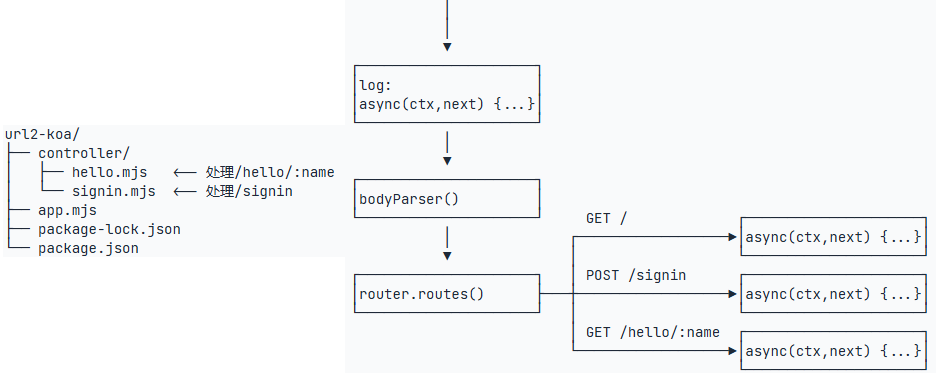
// 重构,如果能把URL处理函数集中到某个js文件,或者某几个js文件中就好了,然后让app.mjs自动导入所有处理URL的函数。// GET /async function index(ctx, next) {    ctx.response.type = 'text/html';    ctx.response.body = `<h1>Index Page</h1><form action="/signin" method="post">    <p>Name: <input name="name" value="koa"></p>    <p>Password: <input name="password" type="password"></p>    <p><button type="submit">Submit</button></p></form>`;}
// POST /signinasync function signin(ctx, next) {    let name = ctx.request.body.name || '';    let password = ctx.request.body.password || '';    console.log(`try signin: ${name}, password: ${password}`);    if (name === 'koa' && password === '12345') {        ctx.response.type = 'text/html';        ctx.response.body = `<h1>Welcome, ${name}!</h1>`;    } else {        ctx.response.type = 'text/html';        ctx.response.body = '<h1>Signin failed!</h1><p><a href="/">Retry</a></p>';    }}
// 导出处理函数:export default {    'GET /': index,    'POST /signin': signin};

// hello.mjsasync function hello(ctx, next) {    // 获取:name参数:    let s = ctx.params.name;    ctx.response.type = 'text/html';    ctx.response.body = `<h1>Hello, ${s}</h1>`;}
export default {    'GET /hello/:name': hello}
// app.mjs// 扫描controller目录:const dirname = path.dirname(fileURLToPath(import.meta.url));console.log(`scan dir ${dirname}...`);// 列举 *.mjs 文件:let files = readdirSync(path.join(dirname, 'controller')).filter(f => f.endsWith('.mjs'));for (let file of files) {    // 导入模块:    console.log(`import controller/${file}...`);    let { default: mapping } = await import(`./controller/${file}`);    // 把每个URL映射添加到router:    for (let url in mapping) {        if (url.startsWith('GET ')) {            // 类似 'GET /hello/:name'            let p = url.substring(4);            router.get(p, mapping[url]);            console.log(`mapping: GET ${p}`);        } else if (url.startsWith('POST ')) {            // 类似 'POST /signin'            let p = url.substring(5);            router.post(p, mapping[url]);            console.log(`mapping: POST ${p}`);        } else {            console.warn(`invalid mapping: ${url}`);        }    }}
// controller.mjs// controller.mjs:async function scan(router, controllerDir) {    // 扫描controller目录:    const dirname = path.dirname(fileURLToPath(import.meta.url));    console.log(`scan dir ${dirname}...`);    let files = readdirSync(path.join(dirname, controllerDir)).filter(f => f.endsWith('.mjs'));    for (let file of files) {        // 导入模块:        console.log(`import controller/${file}...`);        let { default: mapping } = await import(`./${controllerDir}/${file}`);        // 把每个URL映射添加到router:        for (let url in mapping) {            if (url.startsWith('GET ')) {                let p = url.substring(4);                router.get(p, mapping[url]);                console.log(`mapping: GET ${p}`);            } else if (url.startsWith('POST ')) {                let p = url.substring(5);                router.post(p, mapping[url]);                console.log(`mapping: POST ${p}`);            } else {                console.warn(`invalid mapping: ${url}`);            }        }    }}
// 默认扫描目录为 controller:export default async function (controllerDir = 'controller') {    const router = new Router();    await scan(router, controllerDir);    return router.routes();}

// app.mjsimport controller from './controller.mjs';...// 使用controller(), 注意controller模块导出的是async函数,要通过await调用:app.use(await controller());...
unjuncks
模板引擎就是基于模板配合数据构造出字符串输出的一个组件。
function examResult (data) {    return `${data.name}同学一年级期末考试语文${data.chinese}分,数学${data.math}分,位于年级第${data.ranking}名。`}
examResult({    name: '小明',    chinese: 78,    math: 87,    ranking: 999});// 模板引擎把模板字符串里面对应的变量替换以后,就可以得到以下输出小明同学一年级期末考试语文78分,数学87分,位于年级第999名。
MVC
我们已经可以用koa处理不同的URL,还可以用Nunjucks渲染模板。现在,是时候把这两者结合起来了!当用户通过浏览器请求一个URL时,koa将调用某个异步函数处理该URL。在这个异步函数内部,我们用一行代码:
ctx.render('home.html', { name: 'Michael' });通过Nunjucks把数据用指定的模板渲染成HTML,然后输出给浏览器,用户就可以看到渲染后的页面了:
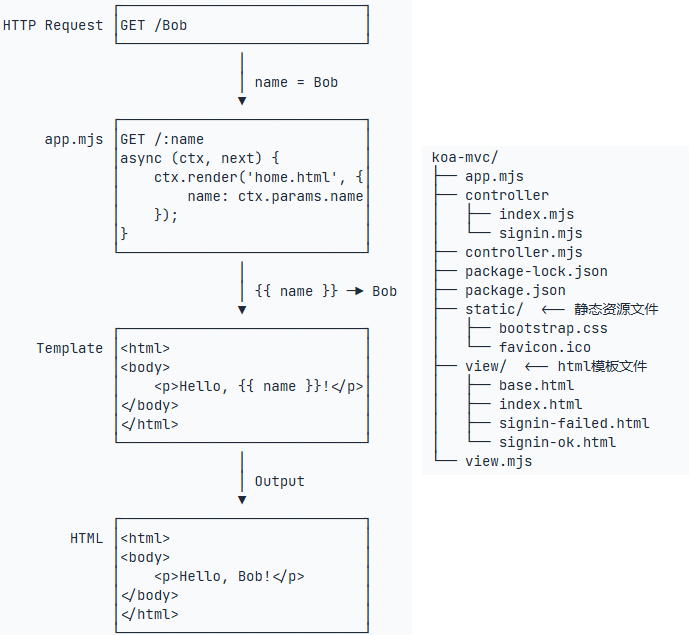
这就是传说中的MVC:Model-View-Controller,中文名“模型-视图-控制器”。异步函数是C:Controller,Controller负责业务逻辑,比如检查用户名是否存在,取出用户信息等等;包含变量{{ name }}的模板就是V:View,View负责显示逻辑,通过简单地替换一些变量,View最终输出的就是用户看到的HTML。MVC中的Model在哪?Model是用来传给View的,这样View在替换变量的时候,就可以从Model中取出相应的数据。
reset
如果我们想要获取某个电商网站的某个商品,输入http://localhost:3000/products/123,就可以看到id为123的商品页面,但这个结果是HTML页面,它同时混合包含了Product的数据和Product的展示两个部分。对于用户来说,阅读起来没有问题,但是,如果机器读取,就很难从HTML中解析出Product的数据。
如果一个URL返回的不是HTML,而是机器能直接解析的数据,这个URL就可以看成是一个Web API。比如,读取http://localhost:3000/api/products/123,如果能直接返回Product的数据,那么机器就可以直接读取。
REST就是一种设计API的模式。最常用的数据格式是JSON。由于JSON能直接被JavaScript读取,所以,以JSON格式编写的REST风格的API具有简单、易读、易用的特点。
2)数据库
- MySQL,大家都在用,一般错不了;
- PostgreSQL,学术气息有点重,其实挺不错,但知名度没有MySQL高;
- SQLite,嵌入式数据库,适合桌面和移动应用。